日本語はこちらから。
This page explains how to set up Easy Custom VFX/UI.
System requirements
Render Pipeline
Both the 2D template and the 3D template will work, but note that some effects require shader adjustments when used in 3D.
Specific modification procedures are explained in each usage section.
Environment in which operation was confirmed
・Unity 2022.2.19
・Unity 2022.3.18
・Unity 2022.3.20
・Unity 2022.3.28
・Unity 2023.3.2
What's in each folder
| Folder | Contents |
|---|---|
| CommonSubShaderGraph | Contains commonly used subgraphs when creating Shader Graphs. |
| DemoScene | Allows you to check samples of effects and screen effects available in this asset. |
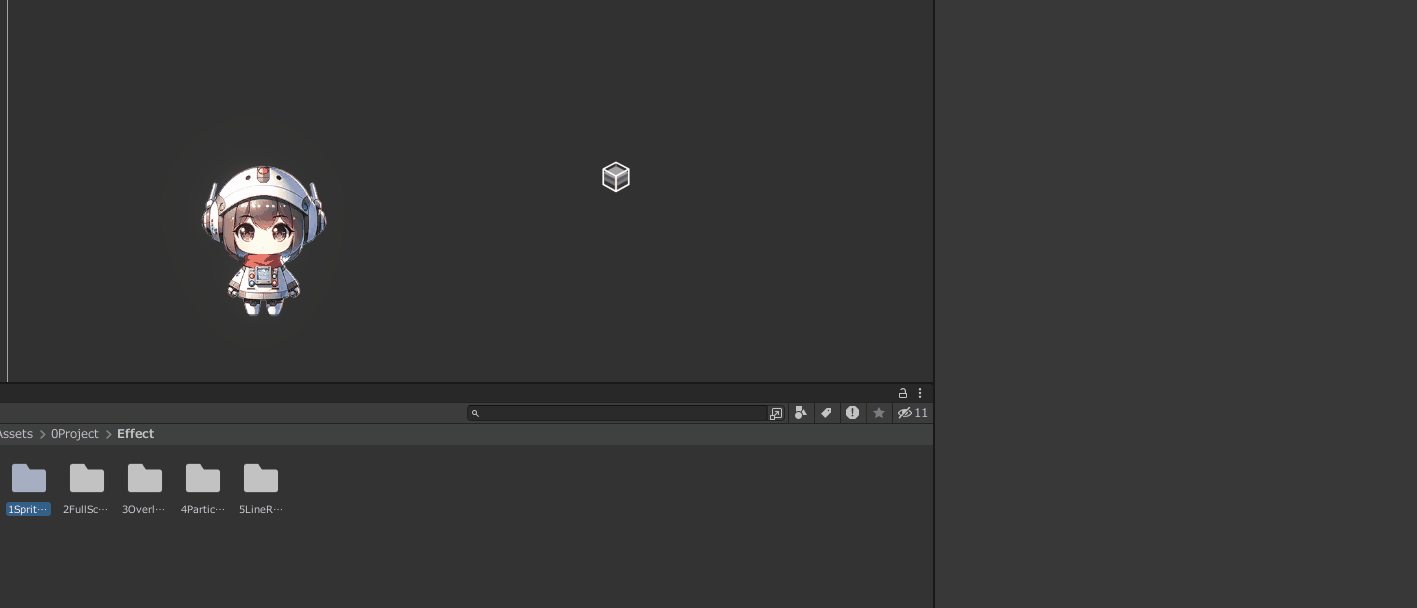
| Effect | The main folder. Contains shaders and materials for processing sprites, full-screen effects, overlay effects, particles, and LineRenderer. |
| SampleFonts | Contains sample fonts used in demo scenes. "MPLUS2-Medium SDF_ASCII" can only be used for ASCII characters (numbers and alphabets). |
| Scripts | Stores script files. |
| ShaderScripts | Stores HLSL files for use in Custom Function in Shader Graph. |
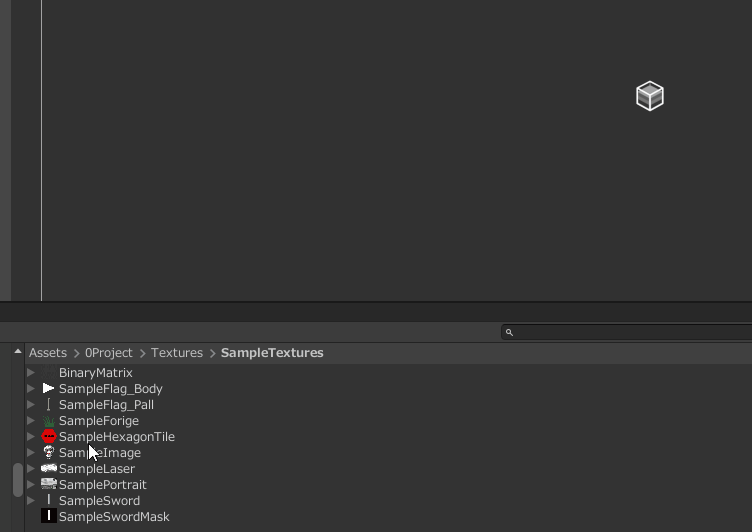
| Textures | Textures used in particles, etc. You can use any texture within the scope of the terms of use. |
| Transition | Contains shaders and materials used for transition effects. |
| UtilityTool | Contains tools for creating wave and zigzag lines. It's a luxurious bonus. |
How to use assets
You can get an idea of what you can do with this asset by looking at the scenes in the DemoScene folder.
The folder structure for DemoScene is as follows.
| Folder | Scene Name | Contents |
|---|---|---|
| Effect | BGParticleSampleScene | Particle samples intended mainly for background effects. |
| FrontParticleSampleScene | Particle samples intended mainly for foreground usage, such as UI elements. | |
| FullScreenEffectDemoScene | Samples intended for effects across the entire screen. | |
| OverlayEffectScene | Samples of effects that manipulate the screen itself (post-processing). Settings need to be configured in the project beforehand for proper usage. DemoScene may not display correctly until settings are configured. Please check the setup instructions below: For 2D: Please refer to the "OverlayEffect(2D) Usage Guide." For 3D: Please refer to the "OverlayEffect(3D) Usage Guide." | |
| LinendererEffectDemoScene | Samples using materials intended for Linenderer objects. | |
| SpriteEffectDemoScene | Samples of materials intended for sprites. | |
| UIEffectDemoScene | Samples of materials that are frequently used in UI effects. | |
| Transition | TransitionSample | Material samples intended for use in transitions. |
1. Usage of Sprite Effect
SpriteEffect is an effect intended to be applied to sprites or UI images.
The usage is very simple.
By modifying the parameters in the material, you can adjust the intensity of the screen effect.
The adjustment options vary for each material (specifically, each shader). Feel free to customize according to your preferences!
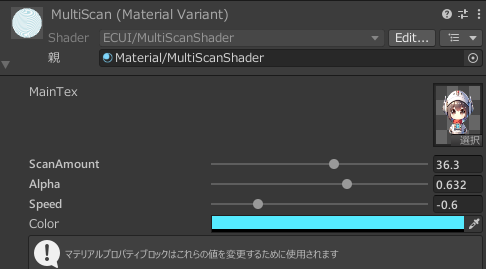
Additionally, some materials override the original sprite color for display.
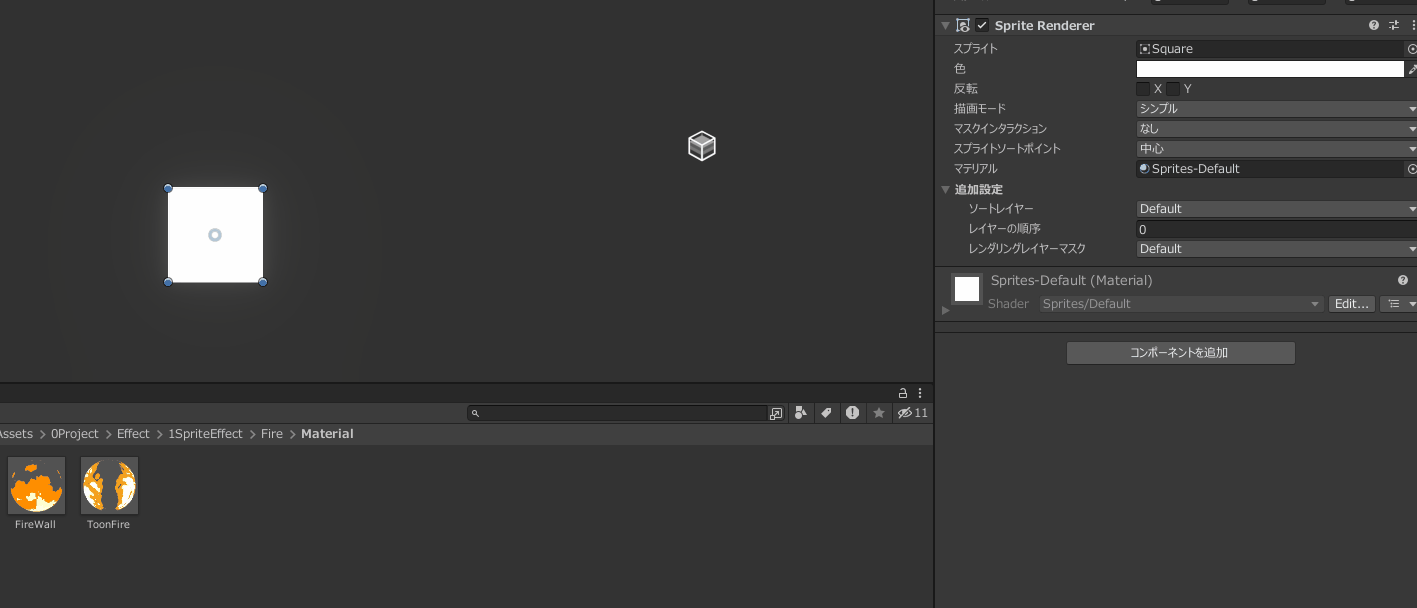
If you want to attach a material to a UI object for use, please refer to the FAQ.
2. Usage of FullScreen Effect
FullScreen Effect is an effect intended to be applied across the entire screen.
To use FullScreen Effect, you would implement it by creating UI elements for the effect and overlaying them on the frontmost layer of the UI.
If you are using a version of Unity 2022 or earlier
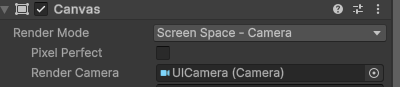
Create a Canvas for UI and apply effects. If you are using Unity 2022 or earlier, you need to set the Canvas render mode to either ScreenSpace - Camera or ScreenSpace - World. Here are the specific steps:
Also, note that materials created with ShaderGraph will not display correctly in ScreenSpace - Overlay. This is a bug in Unity, so please be aware of this limitation. Starting from Unity 2023, you can use ScreenSpace - Overlay without issues.
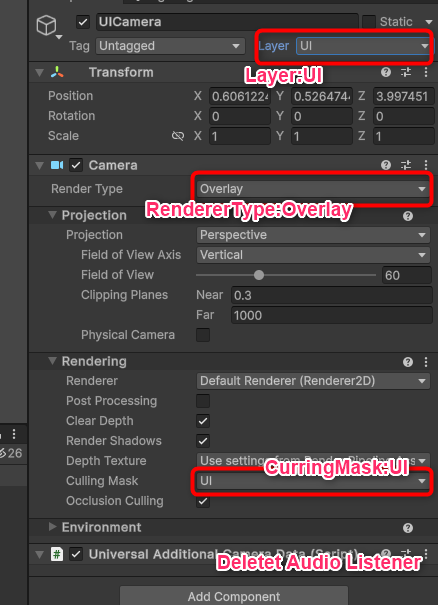
Right-click in the Hierarchy window and select 'Camera' to add it.
Name it something like 'UICamera'.

Configure the added UICamera as follows:
Layer: UI
Render Type: Overlay
Culling Mask: Set to UI only (to reduce rendering load)
Audio Listener Component: Remove (this component is attached to the camera by default)
Now, let's configure the settings for the MainCamera that was originally in the scene.
From the stack, add the UICamera we created earlier. This way, the content rendered by the UICamera will be overlaid on the MainCamera's view (displayed on top).
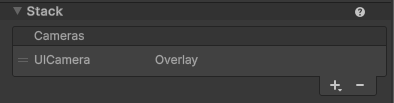
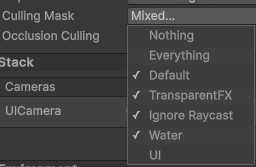
Additionally, to avoid unnecessary performance overhead from double rendering the UI layer, exclude the UI layer from the MainCamera's culling mask.
Set the render mode of the Canvas to either ScreenSpace - Camera or ScreenSpace - World.
Also, attach the camera we created earlier to the render camera.
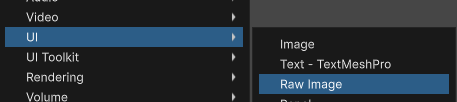
Add a RawImage to the created Canvas.
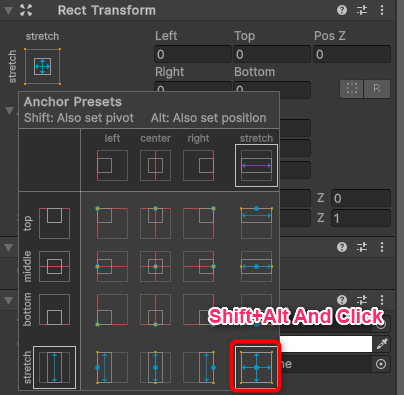
Stretch the RawImage to fit the entire screen. You can do this by pressing Shift + Alt (for Windows) while selecting the bottom-right anchor.
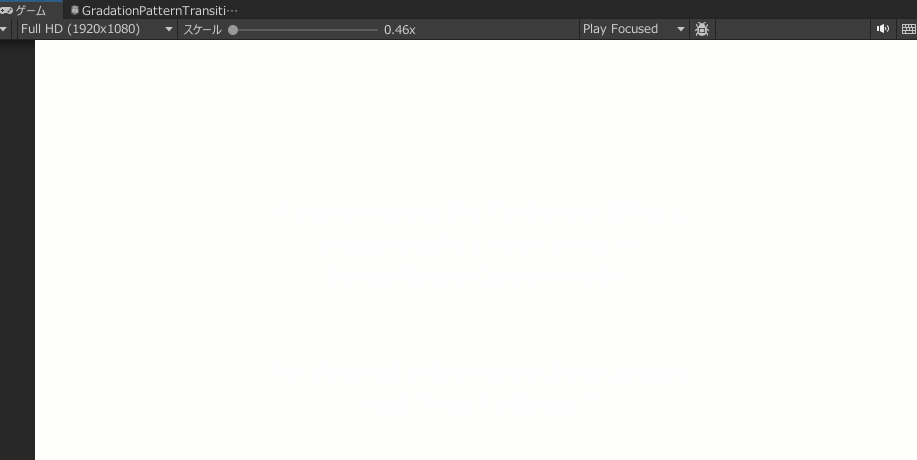
By doing so, the Game View might turn completely white, and that's okay.
When the Canvas for effects is active, buttons underneath become unresponsive, so turn off the Raycast Target for the RawImage.
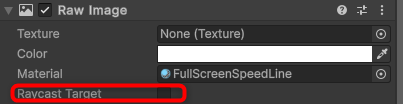
Attach the material from the [2FullScreenEffect] folder to the material of the RawImage component you created.
If you're not sure, try copying the 'FullScreenEffectDemoScene' and see how it's set up.
If you are using Unity version 2023 or later
You can implement it using the same method as the setup for Unity 2022 or earlier versions, but starting from Unity 2023, you can also use ScreenSpace - Overlay as the Canvas renderer mode. However, if you choose to use ScreenSpace - Overlay, you will need to make some adjustments to the shader settings. Please refer to the FAQ for specific steps.
3-1. Usage of Overlay Effect (2D)
To use it, you need to make some settings in the project beforehand. The DemoScene may not display correctly until these settings are configured.
OverlayEffect can manipulate the image captured by the camera to apply effects. It's usable in both 2D and 3D, but the setup methods differ for each.
This section provides explanations for using it in 2D. Just to reiterate, the following applies to 2D (assuming there is a Renderer2D configuration file in the project).
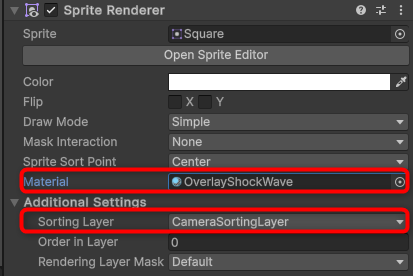
In the Inspector window, select Sorting Layer and press 'Add SortingLayer'.
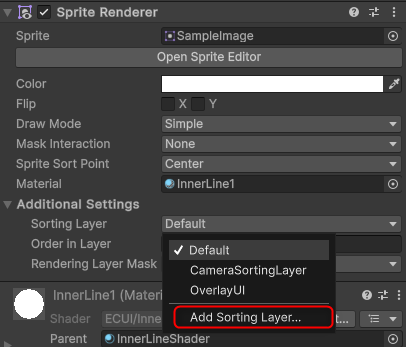
Add 'CameraSortingLayer' to the bottom layer. You can use a different name if you prefer. This is done to set the effect objects to a higher layer than other objects.

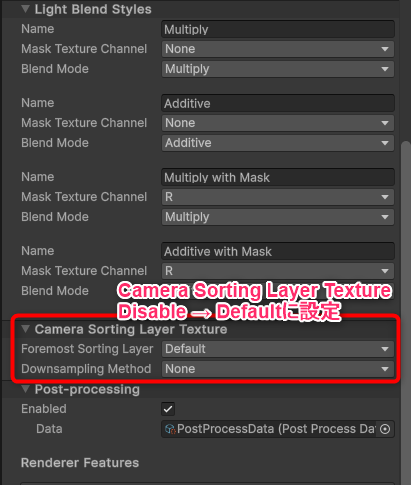
Look for a configuration file named 'Renderer2D' in the Settings folder or similar location.

Select 'Renderer2D', then in the Inspector window, set the 'Foremost Sorting Layer' (formerly 'Disabled') to 'Default'.
This allows the effect to apply to objects on sorting layers higher than 'Default'.
Adjust the sorting layers if there are areas where you don't want the effect applied.
There are two ways to specify the area where effects are applied: using sprites to specify the area where effects are applied and using UI Images to specify the area where effects are applied.
First, let's consider the case of using sprites.
- Create a suitable sprite. This sprite will define the area where the effect is applied.
- With the sprite selected, attach the material from the '3OverlayEffect' folder via the Inspector window. Set the sorting layer to the layer created in Step 1 (in this case, 'CameraSortingLayer').
This completes the process. The effect is now applied within the specified area of the sprite.
When using UI elements, the process is slightly different from using sprites. First, specify the sorting layer on the Canvas side.
- Create a new Canvas with the render mode set to
ScreenSpace - Camera. Refer to Steps 1-4 of the FullScreenEffect usage instructions for how to create it. - Set the sorting layer of the created Canvas to the sorting layer created in Step 1.

Create a RawImage within the newly created Canvas.

Attach the material from the '3OverlayEffect' folder to the added RawImage.
This completes the process. The effect will now be applied within the area of the UI's RawImage.
If you want to place objects (such as text) on top of the OverlayEffect without applying the effect to them, please refer to the FAQ.
3-2. Usage of Overlay Effect (3D)
OverlayEffect manipulates the image captured by the camera to apply effects. It can be used in both 2D and 3D, but the setup methods differ between the two.
Since this asset assumes a setup for 2D use, additional project settings and adjustments to ShaderGraph are necessary for 3D usage.
Here, we'll outline the necessary adjustments for using OverlayEffect in 3D.
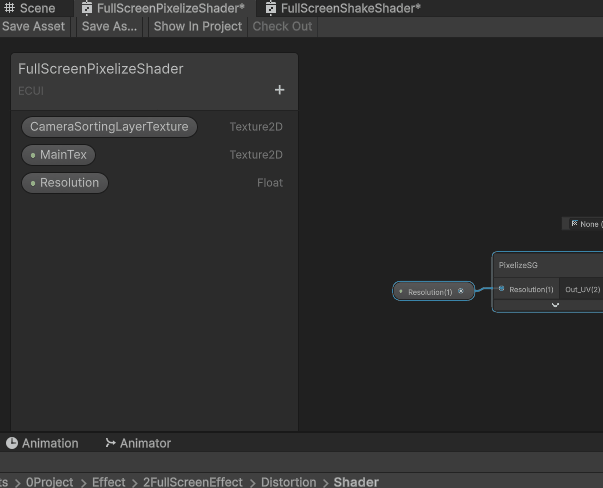
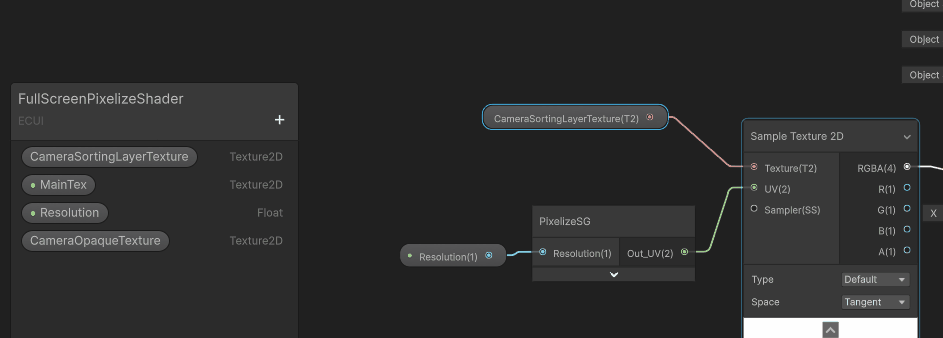
Open the ShaderGraph located at the following path:
EasyCustomVFXUI > Effect > 3OverlayEffect > XX (Type of Effect) > Shader.

Once the ShaderGraph is open, ensure that the CameraSortingLayerTexture property is being used in the properties.
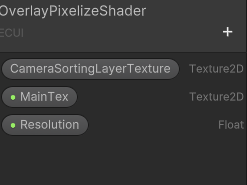
In the case of 3D, you need to replace 'CameraSortingLayerTexture' with 'CameraOpaqueTexture'.
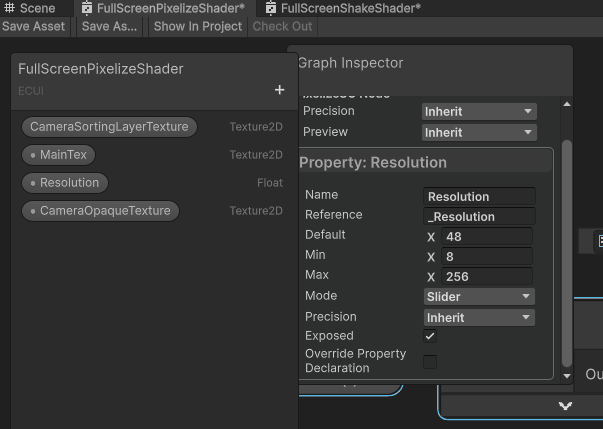
First, follow the GIF below to add the Texture2D 'CameraOpaqueTexture' property.
Note:
- Any spelling mistake, even a single character, will not work. Copy and paste is recommended!
From the Graph Inspector, uncheck the 'Exposed' option.
If this option is checked, it won't display correctly.
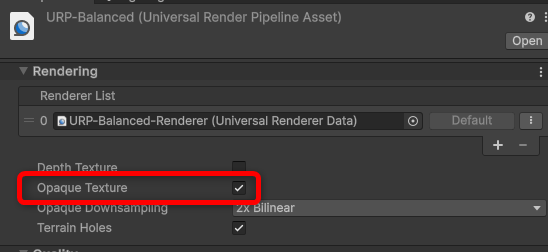
This is the final step. To obtain the 'CameraOpaqueTexture', you need to make changes to the URP settings.
Search for the Settings folder or use the Project search bar to find and open the URP settings page, which should look like the image below.
Within the Rendering section, enable the 'Opaque Texture' checkbox.
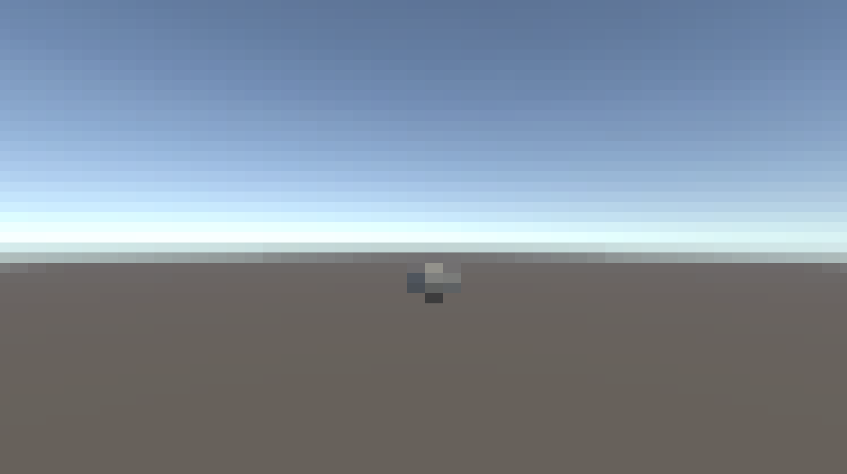
Once the settings are successfully configured, you can use OverlayEffect in 3D as follows!
"If you want to place objects such as text on top of OverlayEffect without applying effects to them, please refer to the FAQ.
4. The usage of Particle
The usage of Particle is simple. Just place the Prefabs from the 'Prefab' folder inside the '4Particle' folder into your scene.
The folder structure is as follows:
| Folder-1 | Folder-2 | Folder-3 | Contents |
|---|---|---|---|
| ComplexParticleExample | ー | ー | This is a composite particle created by combining multiple particles. It's an example of what can be created by combining materials. |
| SoloParticle | BackGround | FallingDown | Particles falling from the top of the screen. |
| FloatingUp | Particles rising from the bottom of the screen. | ||
| Ripple | Particle representing ripples spreading across the entire screen. | ||
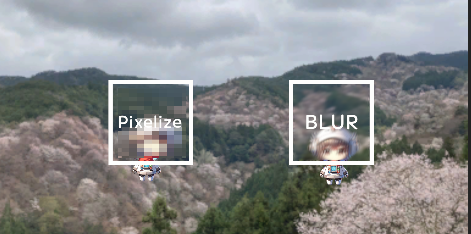
| SpeedLine | Concentrated lines or speed lines spreading across the entire screen. | ||
| Splash | Particles bursting and spreading across the entire screen. | ||
| Weather | Particles intended for use as weather information. | ||
| Front | Contraction | Particles converging towards the center. | |
| Diffusion | Particles diffusing in various directions. | ||
| FallingDown | Particles falling from the top. | ||
| FlareAndFlash | Particles with flare effects or brief flashing effects. | ||
| FloatingUp | Particles rising from the bottom. | ||
| Lightning | Crackling particles reminiscent of lightning. | ||
| Orbital | Particles rotating in orbit. | ||
| Popup | Particles popping up. | ||
| Ray | Particles resembling radiation. | ||
| Splash | Particles spreading rapidly for a moment. | ||
| Spread | Particles gradually increasing in size. |
5. How to use the LineRenderer
This assumes attaching to an object with the LineRenderer component.
Simply place the "Prefab" from the "5LineRendererEffect" folder into the scene.
Of course, it's also possible to reflect only the material on a GameObject with an existing LineRenderer component.
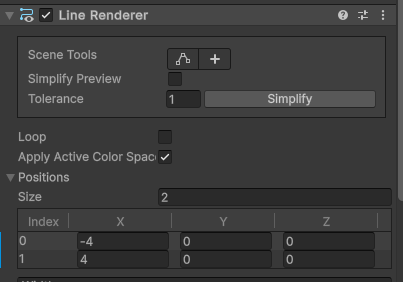
Rather than explaining how to use this asset, this is an explanation of the LineRenderer feature of Unity's standard functionality. The starting and ending points of the line are set from the "Size" of the LineRenderer component.
Additionally, attaching the script called WaveLineRenderer from the UtilityTool folder will automatically interpolate the line between the starting and ending GameObjects. You can choose between interpolation methods like wave lines (setting Smooth to 1 will make it a straight line) or zigzag lines.
It's a seriously useful tool.
How to Use Transition
⚠️If you are using transitions, make sure to set the Canvas Render Mode to Screen Space - Camera.

For more details, please refer to this section.⚠️
The implementation method of how to use Transition is the same as Step 6 of the usage of FullScreen Effect (Create a Transition Canvas, attach a RawImage or Image component, expand it to fill the screen, and turn off Raycast Target).
Here are the subsequent steps from there.
Select the GameObject under Canvas, press "Add Component" in the Inspector window, and attach TransitionProgressController.
*Note that simply attaching TransitionProgressController will automatically attach the RawImage component as well.
The parameters of the material attached to the UI cannot be accessed from animation clips, etc. Therefore, the script to access the material parameters is TransitionProgressController.
It allows access to the Progress parameter of the Material from the script, and can be executed even in the Scene View.
Attach the material from the Transition folder to the material of the RawImage component. Also, set the Raycast Target to OFF.

As an implementation, imagine overlaying the UI for transition on the front of the UI.
Therefore, set the sorting layer of the Canvas for Transition to the front.
It's a good idea to create and set a new sorting layer.
Additionally, you cannot display a Canvas with the render mode ScreenSpace-Camera on a layer higher than a Canvas with the render mode ScreenSpace-Overlay.
If there is already a Canvas with the render mode ScreenSpace-Overlay in the scene, please adjust the render mode of the target Canvas to ScreenSpace-Camera.
To make a movement that covers the entire screen, change the value of Progress of TransitionProgressController.
After that, you can implement any transition you like by changing the value of TransitionProgressController using DoTween or animation clips.
Feel free to modify the TransitionProgressController script, as it is a simple script that only accesses material properties.
FAQ
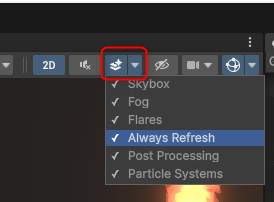
The shader was applied, but it doesn't animate in the Scene View
To animate shaders based on time in the Scene View, please enable the 'Always Refresh' option in the Scene View settings.
Method to apply Shader Graph-generated materials to UI objects
When attaching a material to a UI object (such as an Image), it may not display correctly. Below are some solutions:
For versions of Unity prior to 2022.XX:
Please configure the UI Canvas settings to ScreenSpace-Camera or ScreenSpace-World using the method explained in the "FullScreen Effect Usage" guide.
Attaching ShaderGraph-generated materials to a Canvas with the render mode set to ScreenSpace-Overlay may not display correctly due to a bug in Unity.
For an implementation example in UI, please refer to the UIEffectDemoScene.
For versions of Unity after 2023.XX:
You can use Canvas without relying on the render mode setting.
However, in that case, you need to make some adjustments in the shader settings.
Firstly, with SpriteUnlit, if the Canvas setting is set to ScreenSpace-Overlay...
The background that should be transparent won't be transparent. It will turn completely black.
As a solution, double-click on the Shader Graph attached to the material you want to use as UI.
Select Canvas from the GraphInspector in ShaderGraph.
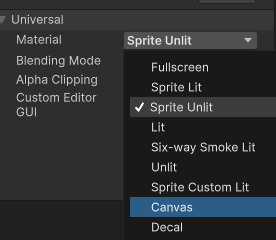
By doing so, even with the Canvas render mode set to ScreenSpace-Overlay, the background will be transparent and displayed correctly.
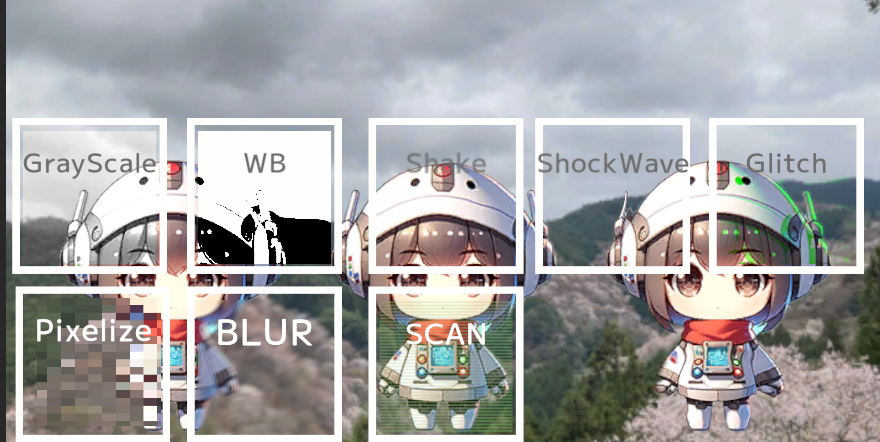
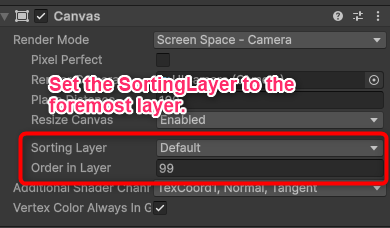
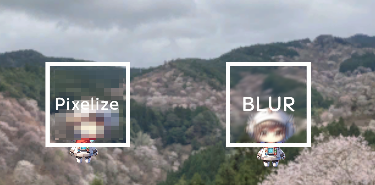
I want to place text or other objects on top of the OverlayEffect
There may be cases where you want to create buttons with a frosted glass effect, like the menu screen of APEX.
In such cases, create a layer above the Effect Canvas where effects are not applied, similar to the concept of creating a layer that does not have effects applied.
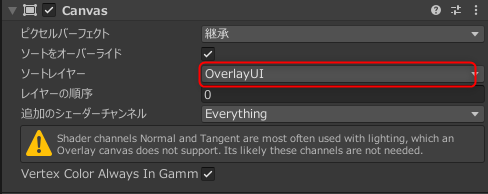
Select the sorting layer of the Canvas. Press Add Sorting Layer.
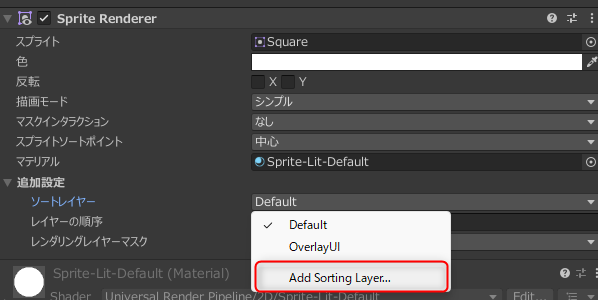
You can name it anything, but create a new layer at the bottom. Here, I named it "OverlayUI".

Under the Canvas where the effect is applied, create another Canvas and place it.
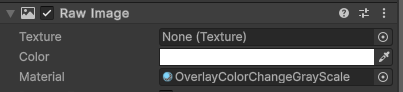
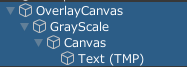
In the image below, "GrayScale" under "OverlayCanvas" is a RawImage, and under that, a Canvas is created.
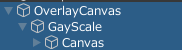
Assign the sorting layer of the newly created Canvas to the sorting layer created earlier from the Inspector window.
Objects placed under this front layer Canvas will not have effects applied.
Let's place text, etc.!
With the hierarchical relationship in the image below, if the sorting layer created in Step 2 is correctly set, text, etc. should be displayed without effects applied.
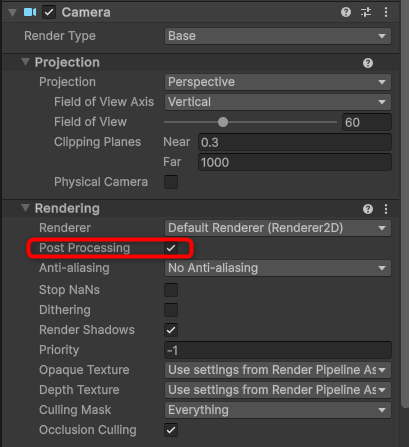
Settings for making objects glow (Bloom)
For those saying, "It doesn't glow like the DemoScene!" First, to make objects glow, post-processing settings are required.
Here are the steps:
Right-click on the Hierarchy window, select Volume > Global Volume.

Select the created Global Volume, and from the Inspector window, select the profile.
Press the "New" button to create a new Profile.
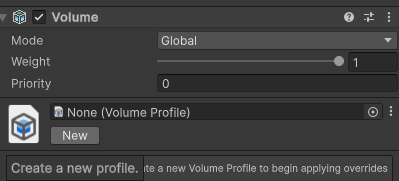
Create a new profile
Check the box in the location shown in the image below.
If not checked, the post-processing will not be applied.
From the added Global Volume, select "Add Override" and add Bloom.
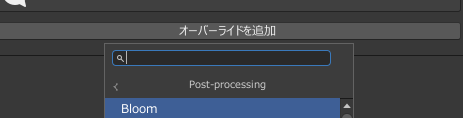
Specify the desired strength.
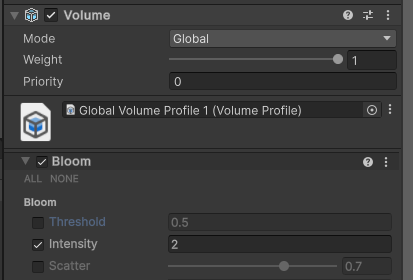
Then, objects specified with HDR colors will start to glow.
If you want to make an object glow but it's not using a glowing color (HDR Color)
In the Color property of the material, there are two types: HDR Color (capable of glowing) and Default Color (not capable of glowing).
Since it's categorized based on my sense, there are often cases where you want to make an object glow even though it's categorized as Default Color, and vice versa.
In such cases, simply modifying the settings of the ShaderGraph for the target will enable glowing.
Clicking on the part that serves as the "parent" of the material will take you to the ShaderGraph.
Since I typically create them with Material Variants, you can quickly access the parent material created simultaneously with the ShaderGraph.

Select the Color property in the Blackboard.
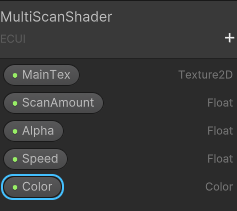
Change the Mode in the GraphInspector from "Default" to "HDR".
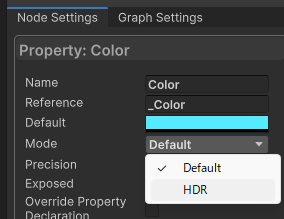
That's all.
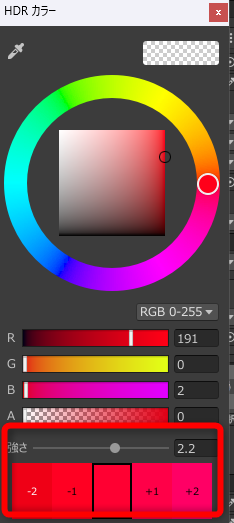
Afterward, adjusting the intensity of the HDR color in the material will make it glow if post-processing is applied.
Controlling Material Attached to UI via Animation Clips
The properties of a material attached to a UI object cannot be manipulated directly from animation clips.
To dynamically change the values of material properties, you need to access them through scripts.
In the "Scripts" folder, there are sample scripts like "TransitionProgressController" and "ParallelogramGageController" that demonstrate accessing material properties from scripts.
Please refer to these scripts and create your own accordingly.
Popup Appeared When Selecting Canvas Text - What to Do?

If a popup appears when selecting a text element in the canvas, such as the "Import TMP Essentials" button, click it to install TextMeshPro.
Text assets embedded in the project are designed to use TextMeshPro. If TextMeshPro is not installed, you may encounter such popups.
Also, sometimes text may not display until the scene is reloaded, so try reopening the scene.
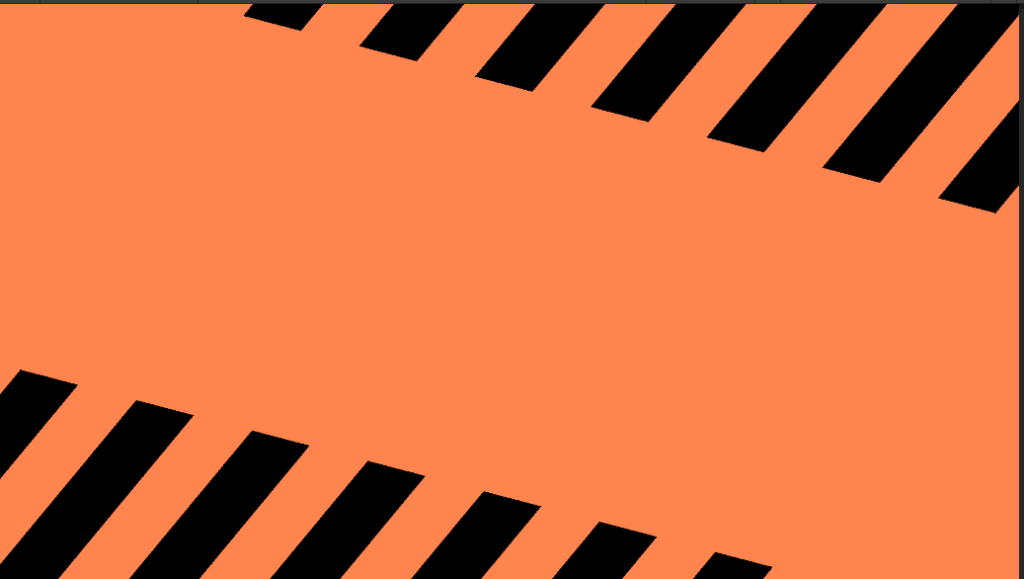
Outline Shader Causes Some Lines to Flatten
Outline shaders like OutlineShader typically work by expanding the original texture and applying an outline around it.
If the texture does not have enough padding, parts of the outline may be obscured.
The solution is to edit the texture image in an image editing software to add padding around the edges before importing it into Unity.
In the provided example images, the left image (NG) lacks sufficient padding, while the right image (OK) has adequate padding.

What's the difference between Additive and AlphaBlend settings for particle material shaders?
In general, color values range from 0 to 1, with darker colors closer to 0 and brighter colors closer to 1.
When a color value exceeds 1, it starts to emit light if post-processing is applied.
For particles such as flames or smoke, where transparent objects overlap, it would look odd if the overlapping parts emitted light.
In such cases, we use "Alpha Blend," which blends the background and transparency.
In the case of "Additive," colors are added together, meaning values greater than 1 make the particles emit more light as they overlap.
How to remove outlines during particle playback?
In the default project settings, outlines are shown in orange and can make visibility difficult.

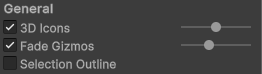
To remove them, click on the globe icon in the upper right corner of the Scene view.
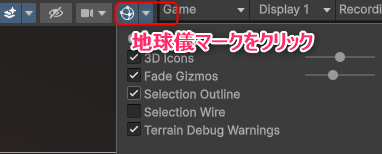
Then uncheck "SelctionOutline."
This will make the orange outlines disappear.
Questions and Contact Information
Feel free to reach out via Twitter DM (@mitakamikata) or through this platform.
You can also contact me via the official Discord server.
However, please note that as I manage everything alone, there may be delays in responses or cases where providing individual answers is challenging.
In such cases, I may refer you to the FAQ section where similar questions are addressed.
Thank you for your understanding.
Wishing you a fantastic game development journey!