
日本語 | English
This is an explanation of how to use Easy Effect Viewer, which is sold on the Unity Asset Store.
Overview
Easy Effect Viewer is a tool that displays Particle Systems and VFX Graphs in your project as thumbnails and allows you to organize and search them using tags.
It is designed to help engineers, VFX artists, and level designers efficiently manage their effect assets.
Since Unity’s default prefab preview feature cannot display effect previews, it is often difficult to quickly find the effect you’re looking for.

By using this asset, you can greatly streamline the process of finding the effects you’re looking for.
Many Unity developers import effect assets into their projects and then extract only the assets they need for their own work.
However, external asset packages usually contain a large number of effects, and picking out only the ones you truly need can be extremely time-consuming.
To address this, this asset is designed with a workflow in which you tag and categorize only the effects required for your project, allowing you to instantly find and use the desired effects from large collections of assets.
The main features are as follows:
- Thumbnail display of effect prefabs
- Tagging functionality for each effect
- Simulation playback in the Inspector’s Preview window
Update History
V1.0.7(2026/3/7)
New Features
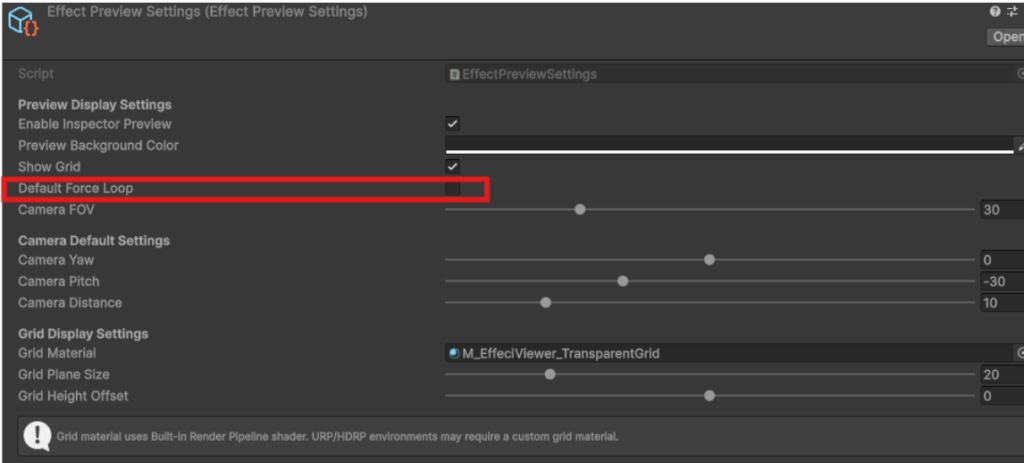
- Default Loop Playback Setting — You can now set the default loop playback behavior in the Settings asset. No more toggling it manually each time you preview an effect.
Improvements
- Improved playback for effects without a root ParticleSystem — Effects that only have ParticleSystems on child objects now play correctly in the preview.
- Accurate playback speed for nested particle effects — Nested ParticleSystems now simulate at the correct speed, resolving an issue where they could appear faster than intended.
V 1.0.6 (2026/2/15)
- Fixed a bug where objects could not be drag-and-dropped from the Project window to the Scene after importing assets.
- Fixed a mysterious 0.5cm gap that appeared at the top of the Inspector window so that it is no longer displayed.
V 1.0.5 (2026/2/14)
Added a sample dummy ParticleSystem.
V 1.0.4 (2026/2/13)
Removed the specification to reset the Transform to the origin when generating a Prefab; modified to place the Prefab in the scene with its configured Transform.
V 1.0.3 (2026/2/7)
Initial Release
Supported Environment
- Unity Version: Unity 2019.4 or later
- Render Pipelines:
- Built-in Render Pipeline
- URP
- HDRP
Quick Start
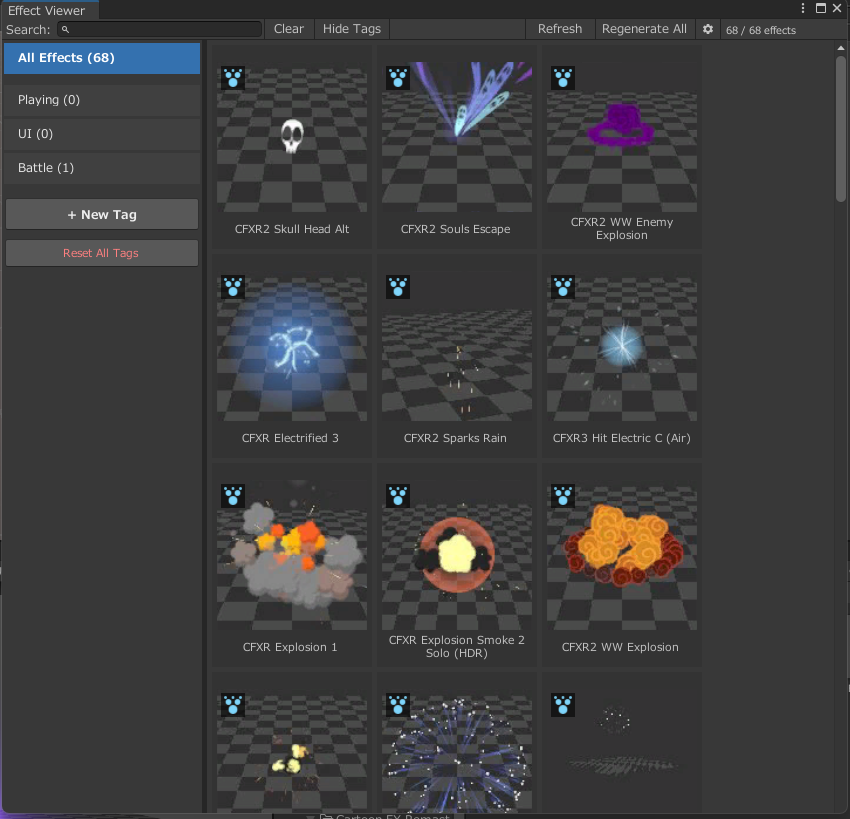
1. Using the thumbnail display feature in the Effect Viewer
Select Tools > EffectViewer > Viewer from the menu to open the window.
You can also open it with Ctrl + Shift + E.

When the window is opened, all Particle Systems and VFX Graph effects in the project are automatically displayed.
On the first display, thumbnail generation will run, so it may take a little time.

2. Creating a New Tag
From the left lane, press the + New Tag button to create a new tag.

3. Assigning Tags
Select the effect you want to tag and right-click to assign a tag.
You can also assign tags by dragging and dropping the effect into the tag lane.

4. Previewing Effects in the Inspector
When you select an effect, it will play in the Preview within the Inspector.

Press the Thumbnail button in the Preview to capture the current state of the effect and set it as the thumbnail.


Detailed Explanation of the Effect Viewer Window
Basic Features
- Automatic Scan:
When the window is opened, all Particle System and VFX Graph prefabs in the project are automatically detected.
Toolbar Button Descriptions:
- Toggle Tag Display Button:
Use the tag icon on the far left to show or hide the tag pane. - Search Box:
Filter effects by name. - Refresh Button:
Rescan the project. Use this when new effect assets are imported while the Viewer is open. - Regen Thumbs:
Regenerate all thumbnails. - Settings Button:
Open the settings file.
Thumbnail Information

Each thumbnail displays the following information:
- Prefab Name
- Effect Type Icon:
An icon indicating either Particle System or VFX Graph - Tags:
Up to two assigned tags are displayed
Thumbnail Operations

- Right-Click: Display the context menu
- Add Tag: Add a tag
- Instantiate at Origin: Instantiate the effect at the scene origin (0,0,0)
- Show in Project: Highlight the effect in the Project window
Creating a Tag
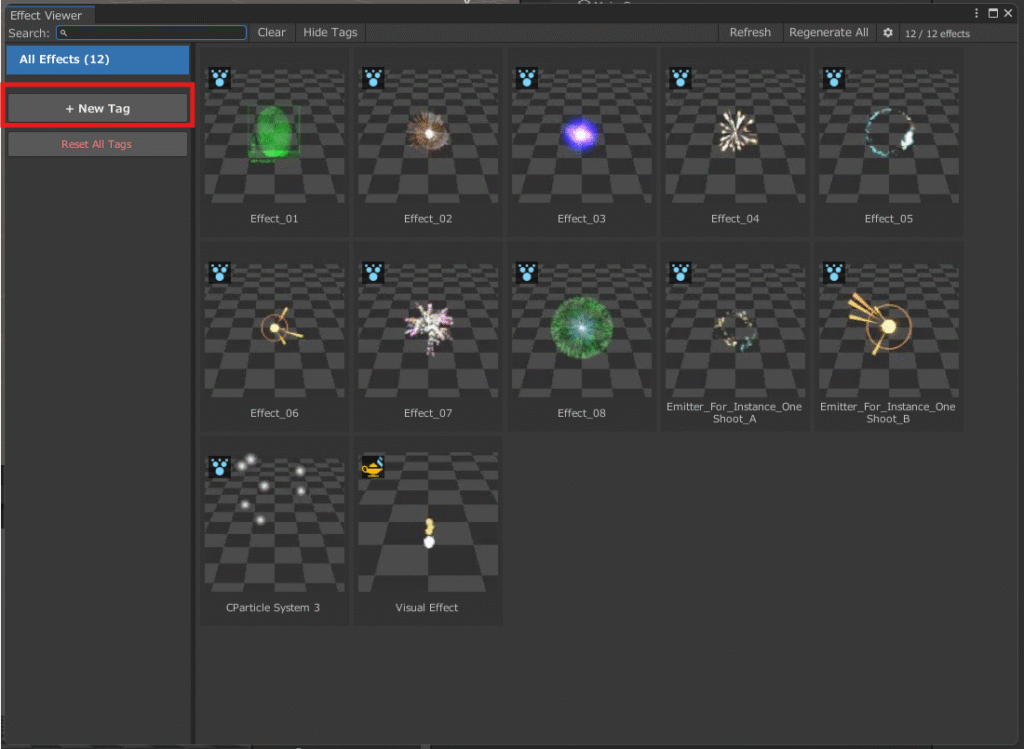

- Click the + New Tag button in the sidebar on the left of the window
- Enter the tag name
- Press Enter to confirm
Assigning Tags
Method 1: Drag & Drop
- Drag the effect thumbnail to a tag in the left panel
Method 2: Right-Click Menu
- Right-click the effect
- Select Add Tag
- Choose the tag you want to assign
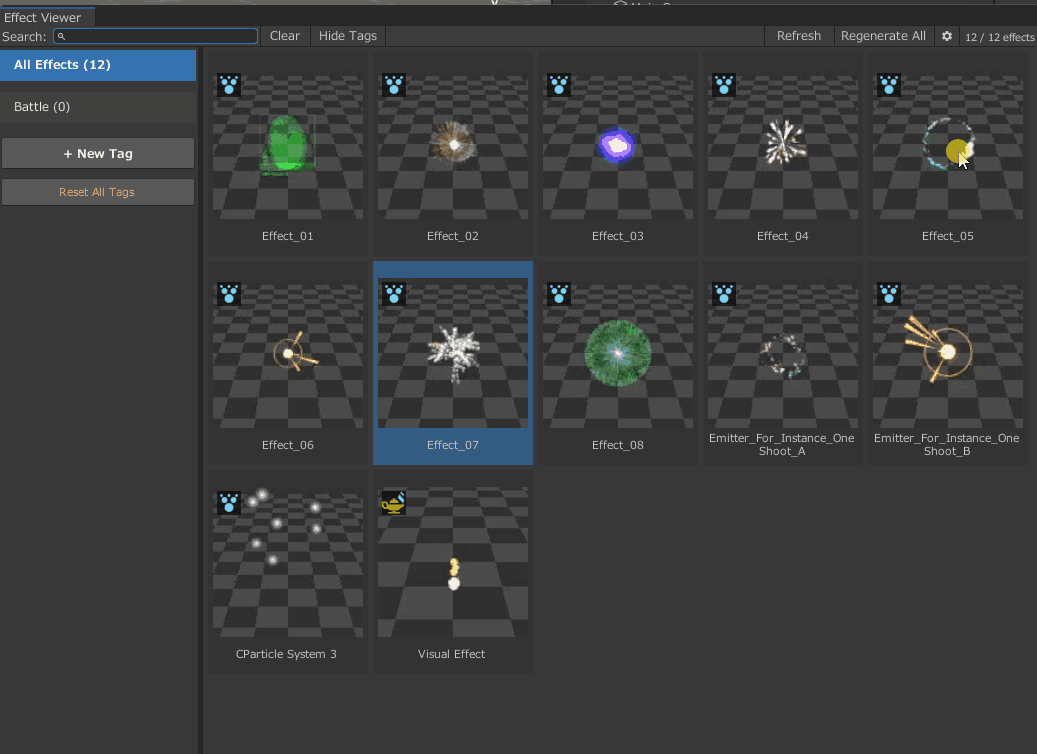
Filtering by Tags
Click a tag on the left panel to display only the effects assigned with that tag

Managing Tags

Right-click a tag to rename or delete it.
- Rename: Right-click the tag → Rename
- Delete: Right-click the tag → Delete (a confirmation dialog will appear)
Adding Objects to Effect Viewer Display
Objects displayed in Effect Viewer must meet the following criteria:
- Must be a prefab
- The prefab’s parent object must have a Particle System or VFX Graph component attached
If a Particle System is attached only to a child object and not the parent, Effect Viewer will not detect it.
Even if a prefab does not meet the above conditions, you can add it to the Viewer by right-clicking it in the Project window and selecting Effect Viewer > Add to Viewer.

Prefabs added manually will display an icon in the top-right corner.

Inspector Preview
When an effect prefab is selected, an interactive preview appears at the bottom of the Inspector.
Note: Selecting a prefab in the Scene hierarchy will not display the preview. It only plays when a prefab is selected in the Project window.


If the preview is not visible, click the area highlighted in red in the image at the bottom of the Inspector window.

Playback Controls
- Play / Stop Buttons: Play or stop the effect
- Speed Slider: Adjust playback speed (0.1x – 3.0x)
- Playback Time Display: Shows the current playback time
Camera Controls
- Right-Click + Drag: Rotate camera (orbit)
- Middle-Click + Drag: Pan camera
- Mouse Wheel: Zoom in/out
- Reset Camera Button: Reset camera position
- Zoom Slider: Adjust zoom level (0.1x – 3.0x)
Display Settings
- Background Color: Change the preview background color
- Show Grid: Toggle grid plane visibility
Thumbnail Update
- Thumbnail Button: Capture the current preview state and update the thumbnail
4. Thumbnail Generation
Automatic Generation
- During the initial scan, thumbnails that have not yet been generated are created automatically.
- Generated thumbnails are saved in
Assets/EasyProjectViewer/ThumbnailImage/. - Thumbnails are captured after a certain period of effect playback. To change the timing, use
Tools > EffectViewer > Settings > ViewerSettings. - Effects that have a delay before playback may not be captured correctly in automatically generated thumbnails. In such cases, use the Thumbnail Generation feature in the Preview.

Regenerating Automatic Thumbnails
- You can regenerate all thumbnails.
- Caution: This will overwrite any thumbnails created manually.

Customizing Settings
Viewer Settings
You can open the settings window from Tools > EffectViewer > Settings > Viewer Settings.

Thumbnail Capture Settings

Configure settings for automatically generated thumbnails.
Automatic Thumbnail Camera Settings
- Camera Pitch: Vertical angle of the camera
- Camera Yaw: Horizontal angle of the camera
- Camera Distance Multiplier: Camera distance multiplier (0.5x – 5.0x)
- Background Color: Background color (default: dark gray)
Thumbnail Generation Settings
- Thumbnail Size: Size of the thumbnail (default: 128px)
- Simulation Time: The point in time to simulate the effect for thumbnail capture. For example, a value of 0.5 generates the thumbnail after 0.5 seconds of simulation. (Range: 0 – 5 seconds, default: 0.5 seconds)
Preview Settings
You can open this from Tools > EffectViewer > Settings > Preview Settings.

Preview Display Settings
- Background Color: Preview background color (default: gray)
- Show Grid: Toggle grid plane visibility (default: ON)
- Camera FOV: Camera field of view (10° – 90°, default: 30°)
Default Camera Settings
- Camera Yaw: Initial horizontal angle of the camera (-180° – 180°, default: 0°)
- Camera Pitch: Initial vertical angle of the camera (-89° – 89°, default: -30°)
- Camera Distance: Initial camera distance (1 – 50, default: 12)
Grid Display Settings
- Grid Material: Set the material for the grid. Two materials are provided, but you can switch to any material you like:

- M_EffectViewer_Grid: Checkered grid
- M_EffectViewer_TransparentGrid (default): Transparent grid


Grid Display Parameters
- Grid Plane Size: Size of the grid plane (1 – 100)
- Grid Height Offset: Height offset of the grid (-10 – 10)
Storage and Specifications of Thumbnail and Tag Data
- Tag Data:
Assets/EasyProjectViewer/EffectTagDatabase.asset(ScriptableObject) - Thumbnails:
Assets/EasyProjectViewer/ThumbnailImage/{GUID}.jpg
When a prefab is deleted, its corresponding thumbnail and tags are automatically removed as well.
Troubleshooting / FAQ
Q: Can I change the thumbnail resolution?
A: Yes. You can change it in Tools > EffectViewer > Settings > Viewer Settings > Thumbnail Size. After changing, you need to regenerate thumbnails using Regenerate All.
Q: Is performance okay if I have a large number of effects (100 or more)?
A: Thumbnails are generated progressively and cached, so the Viewer runs quickly after the initial scan.
Q: Will thumbnails disappear if I move a prefab?
A: No. Thumbnails are managed by GUID, so they remain even if the prefab is moved.
Q: How are prefabs containing both VFX Graph and Particle System handled?
A: They are treated as Particle System (priority: Particle System > VFX Graph).
Q: Thumbnails are not generated / Thumbnails appear completely black.
A: It is possible that the capture occurred before the effect started. Increase the Thumbnail Simulation Time in Viewer Settings, then regenerate thumbnails using Regen Thumbs.

Q: VFX Graph is not detected.
A: Only VFX Graphs that have been converted to prefabs are scanned. Please convert your VFX Graph to a prefab. Also, make sure the VFX Graph package is installed.
Q: Inspector preview is not displayed.
A: Check that Enable Inspector Preview is turned on in Preview Settings.
Q: I want to display an effect in the Viewer that was previously excluded.
A: Right-click the prefab and select Add to Viewer.

Q: Can I change the thumbnail size?
A: Yes, you can change it in Viewer Settings > Thumbnail Size.

After changing the setting, press the Regen Thumbs button on the toolbar to regenerate thumbnails with the new size.

Q: Is performance okay if I have many effects?
A: The initial thumbnail generation may take some time.
Since thumbnails are cached, the Viewer runs quickly after the first scan.
Q: Will thumbnails disappear if I move a prefab?
A: No. Thumbnails are managed by GUID, so they remain even if the prefab is moved.
Q: How are prefabs containing both Particle System and VFX Graph handled?
A: They are treated as Particle System.
Q: The tag list is not displayed.
A: Click the tag icon on the far left of the toolbar to toggle the tag pane.

Q: How can I stop automatic thumbnail generation after importing assets?
A: Turn off Auto Generate Thumbnails in Viewer Settings.

Support
For questions or bug reports, please contact me at:
- Twitter (X): https://x.com/mitakamikata (via DM)
- Email: inquiry@yurinchi2525.com
Related Assets
I also offer "Easy Custom VFX/UI", a collection of over 120 effects and shaders.
If you enjoy this asset, please take a look at it as well:
- Asset Store version: https://assetstore.unity.com/packages/vfx/shaders/easy-custom-vfx-ui-built-in-294357
- Booth version: https://yurinchi2525.booth.pm/items/5740481
Third-Party Licenses
Some features were developed with reference to open-source code under the MIT License.
For details, please see the included THIRD-PARTY-NOTICES.md.