
本記事の内容
・Android向けのビルドで、AdMobとSocial Connectorを両方入れたらエラーになった場合の対処方法
前提
- GoogleMobileAds-v8.7.0
- Unity 2022.2.19
- Social Connector v0.5.0
Social Connectorを使う場合の罠
UnityでSNS共有機能を使いたい場合、以下のフリーで公開されているアセット、「Social Connector」がオススメです。

しかし、AdMobなどの別Pluginがある状態でGitページの通りに実装するとエラーになることがあるので注意が必要です。少し解決に時間がかかったので備忘のために解決方法を残します。
参考にしたサイト
https://yuumekou.net/unity-socialconnector-howtouse/
ファイルとフォルダ構成の修正
まずは、こちらに記載している内容を実行します。
しかし、対処した上でも私はビルドエラーになったため、エラー対処方法を記載します。
また、ビルド時のエラーメッセージがとても長く出力されて、ストレスがかかりますが、大事な部分は、「What went wrong:」よりも下の部分です。以下も「What went wrong:」以下のエラーメッセージに絞って記載しています。
クラス重複のエラー
Picked up JAVA_TOOL_OPTIONS: -Dfile.encoding=UTF-8

FAILURE: Build failed with an exception.

* What went wrong:
Execution failed for task ':launcher:checkReleaseDuplicateClasses'.
> A failure occurred while executing com.android.build.gradle.internal.tasks.CheckDuplicatesRunnable
   > Duplicate class androidx.core.app.AppLaunchChecker found in modules core-1.8.0-runtime (androidx.core:core:1.8.0) and jetified-support-core-utils-25.3.1-runtime (:support-core-utils-25.3.1:)
     Duplicate class androidx.core.app.NavUtils found in modules core-1.8.0-runtime (androidx.core:core:1.8.0) and jetified-support-core-utils-25.3.1-runtime (:support-core-utils-25.3.1:)
     Duplicate class androidx.core.app.TaskStackBuilder found in modules core-1.8.0-runtime (androidx.core:core:1.8.0) and jetified-support-core-utils-25.3.1-runtime (:support-core-utils-25.3.1:)
     Duplicate class androidx.core.app.TaskStackBuilder$SupportParentable found in modules core-1.8.0-runtime (androidx.core:core:1.8.0) and jetified-support-core-utils-25.3.1-runtime (:support-core-utils-25.3.1:)
     Duplicate class androidx.core.content.FileProvider found in modules core-1.8.0-runtime (androidx.core:core:1.8.0) and jetified-support-core-utils-25.3.1-runtime (:support-core-utils-25.3.1:)
Duplicate class androidx.core.content.FileProvider$PathStrategy found in modules core-1.8.0-runtime (androidx.core:core:1.8.0) and jetified-support-core-utils-25.3.1-runtime (:support-core-utils-25.3.1:)こんな感じのエラーが出ている場合、Gitから取得したSocialConnectorのフォルダに入っている、support-core-utils-25.3.1.aarが悪さをしています。(既存のクラスと競合を起こしている)
Social ConnectorのGitページにも書いていますが、support-core-utils-25.3.1.aarを削除してしまいましょう。
ビルドに必要なファイルが作成されないエラーの場合
こんなエラーメッセージがある場合。
Picked up JAVA_TOOL_OPTIONS: -Dfile.encoding=UTF-8

FAILURE: Build failed with an exception.

* What went wrong:
Execution failed for task ':launcher:bundleReleaseResources'.
> A failure occurred while executing com.android.build.gradle.internal.res.Aapt2ProcessResourcesRunnable
   > Android resource linking failed
フォルダ構成が間違っていることが原因の可能性が高いです。
まず、「Assets > Plugins > Android」の以下のフォルダ階層を以下の画像のようにします。
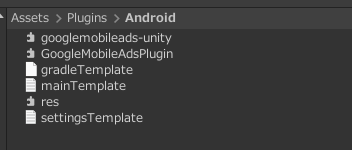
Social ConnectorのGitHubページには、「Assets > Plugins > Android」直下にAndroidManifestを配置していますが、AdMobなどの別PluginのManifestファイルがある場合、「Assets > Plugins > Android」直下にAndroidManifestを配置してはいけません。ほぼ確実に競合してエラーになります。
こちらの記事(Android専用の追加対応②)のとおり、まずAndroid配下に、res.androidlibというフォルダを作成します。Unityエディター上は、「res」という名前で表示されます。
res.androidlibというフォルダをダブルクリックするとエクスプローラーが開きます。
そしてこのフォルダ階層の中にGitからダウンロードしてきた、AndroidManifestとresフォルダをまとめて格納します。
「Assets > Plugins > Android > res.androidlib」フォルダの構成。

AndroidManifest.xmlは、こちらの記事のとおり、以下の内容に更新しています。
<?xml version="1.0" encoding="utf-8"?>
<manifest xmlns:android="http://schemas.android.com/apk/res/android"
          package="custom.android.res">
    <application
        android:theme="@style/UnityThemeSelector"
        android:label="@string/app_name">
        <activity android:label="@string/app_name"
                  android:name="com.unity3d.player.UnityPlayerActivity">
            <intent-filter>
                <action android:name="android.intent.action.MAIN"/>
                <category android:name="android.intent.category.LAUNCHER"/>
                <category android:name="android.intent.category.LEANBACK_LAUNCHER"/>
            </intent-filter>
            <meta-data android:name="unityplayer.UnityActivity"
                       android:value="true"/>
        </activity>
        <provider android:name="androidx.core.content.FileProvider"
                  android:authorities="[プロジェクトのパッケージ名に変更!].fileprovider"
                  android:exported="false"
                  android:grantUriPermissions="true">
            <meta-data android:name="android.support.FILE_PROVIDER_PATHS"
                       android:resource="@xml/filepaths"/>
        </provider>
    </application>
</manifest>
これでビルドすると、エラー解消できました。
まとめ
ほんとビルドエラーは直接的な原因がわからないので、対処が難しいですよね。
この記事がよかったら、ぜひX(@mitakamikata)もフォローしてくださいね。
それでは素敵なゲーム制作ライフを!
ゲームの素材探しに困っていませんか?
ゲームのUI素材探しなら、Free Game UI Assets がオススメです!
完全無料で著作権フリーな、UIのアセット素材がなんと1700以上使い放題!
ぜひ、こちらもチェックしてみてください。


コメント